Có nhiều cách lưu trữ khi làm việc với file, có thể băm ra và lưu trong database, cũng như lưu tại local project (trong project, static folder), nhưng nó không phải là cách tốt để quản lý file. File chiếm nhiều dung lượng và làm giảm hiệu suất của hệ thống cũng như chúng ta sẽ tốn nhiều chi phí cho cách ở trên. Giải pháp tốt thay thế cho việc lưu trữ file là sử dụng 1 nhà cung cấp giúp lưu trữ file riêng biệt với hệ thống chẳng hạn như Google Cloud, Azure hay Amazon AWS.
Trong bài viết hôm nay, chúng ta sẽ tìm hiểu cách sử dụng Amazon Simple Storage Service hay còn gọi là S3.
Theo dõi source code tại đây, branch dev nha
Link postman để test cho dễ.
Các bạn tiếp tục với source code hơm bữa nha.
Kết nối đến Amazon S3
Amazon S3 cung cấp dung lượng lưu trữ mà chúng ta có thể sử dụng với bất kỳ loại file nào. Chúng ta sắp xếp các file thành các nhóm và quản lý chúng trong API của mình thông qua SDK.
Setting
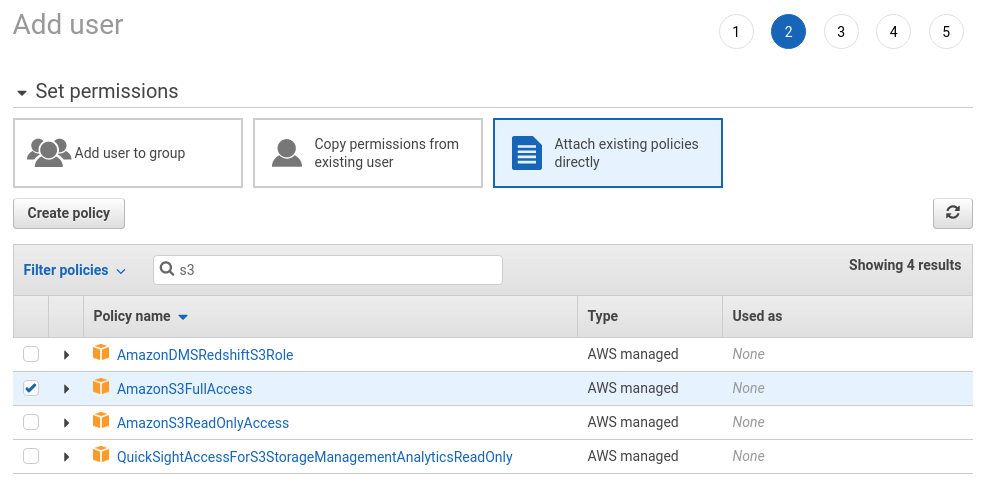
Đầu tiên, ta cần tạo User và cấp quyền. Để làm như vậy, ta truy cập Identity and Access Management (IAM) và tạo User.

Ta cấp quyền để User này có thể quản lý mọi thứ được kết nối với S3, nên hãy lựa chọn thích hợp. Các bạn nên tìm hiểu thêm trên các bài viết khác về phân quyền trên S3.
Sau khi hoàn thành các bước, chúng ta sẽ nhận được 2 tham số Access key ID và Secret access key. Nó dùng để kết nối đến AWS API.
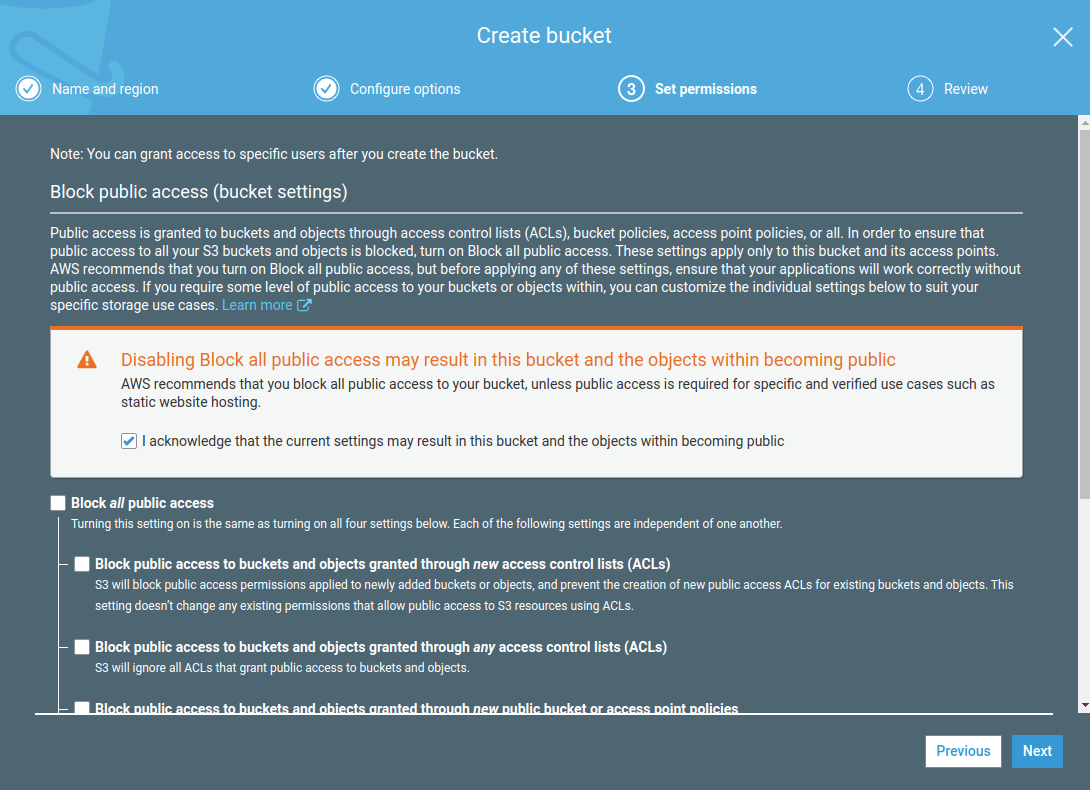
Cuối cùng trong bước chuẩn bị này là ta sẽ tạo ra bucket đầu tiên.
Trong S3, dữ liệu được sắp xếp theo bucket, chúng ta có thể tạo nhiều bucket với nhiều cách setting khác nhau.
Mở ngay Amazon S3 panel và tạo 1 bucket. Lưu ý rằng bucket phải là duy nhất.
Chúng ta cũng cần chọn 1 trong các khu vực có sẵn, tham khảo Tại đây
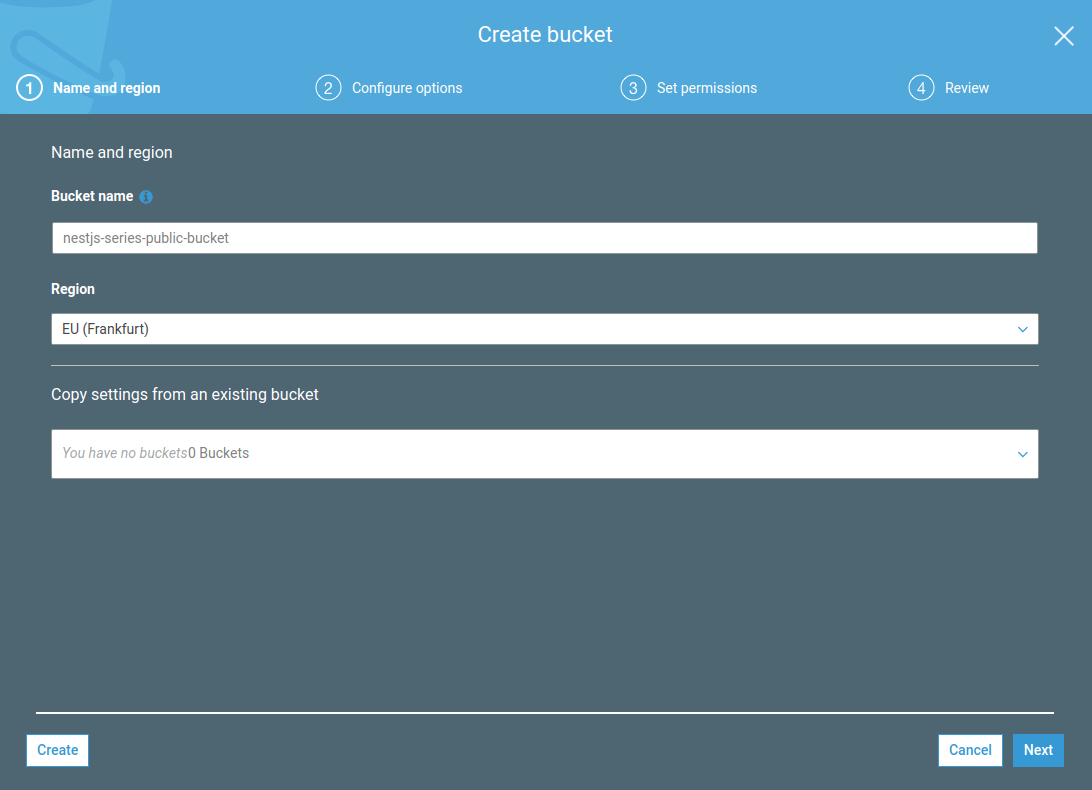
Ta thiết lập bucket để chứa các public File. Tất cả các tệp mà chúng tôi tải lên nhóm này sẽ có sẵn công khai, nhưng ta có thể thay đổi được chỗ này, các bạn an tâm.
Cuối cùng ta khai báo những giá trị trên vào file môi trường
.env
AWS_REGION=*****
AWS_ACCESS_KEY_ID=*******
AWS_SECRET_ACCESS_KEY=*******
AWS_PUBLIC_BUCKET_NAME=********
Upload File
Có thể các bạn xem ở một số tài liệu, người ta hướng dẫn cấu hình trong file main.js, hay khai báo vào ConfigModule.
Ở đây mình sẽ tạo ra Media Module ( đặt tên theo thói quen ) để quản lý những thứ như config, controller, model,… những thứ liên quan đến file.
Chúng ta làm việc với S3 thông qua SDK của nó, chạy command sau:
npm install aws-sdk @types/aws-sdk
Như đã nói ở trên, chúng ta sẽ tạo ra module để dễ dàng quản lý phần này. Sử dụng command sau:
nest g module media
NestJS sẽ sinh ra module media. Tiến hành khai báo model cũng như controller hay service phục vụ cho việc quản lý tốt hơn:media/models/media.model.ts
import * as mongoose from 'mongoose';

const MediaSchema = new mongoose.Schema(
  {
    name: String,
    file_name: String,
    mime_type: String,
    size: Number,
    key: String,
    created_at: { type: Date, required: true, default: Date.now },
  },
  {
    collection: 'media__medias',
  },
);

export { MediaSchema };

export interface Media extends mongoose.Document {
  name: string;
  file_name: string;
  mime_type: string;
  size: number;
  key: string;
  created_at: Date;
}
media/repositories/media.repository.ts
import { Injectable } from '@nestjs/common';
import { InjectModel } from '@nestjs/mongoose';
import { Model } from 'mongoose';
import { Media } from '../models/media.model';
import { BaseRepository } from '../../base.repository';

@Injectable()
export class MediaRepository extends BaseRepository<Media> {
  constructor(
    @InjectModel('Media')
    private readonly mediaModel: Model<Media>,
  ) {
    super(mediaModel);
  }
}
media/services/media.service.ts
import { S3 } from 'aws-sdk';
import { Logger, Injectable } from '@nestjs/common';
import { MediaRepository } from '../repositories/media.repository';
import { ObjectID } from 'mongodb';

@Injectable()
export class MediaService {
  private readonly region;
  private readonly accessKeyId;
  private readonly secretAccessKey;
  private readonly publicBucketName;

  constructor(private readonly mediaRepository: MediaRepository) {
    this.region = process.env.AWS_REGION;
    this.accessKeyId = process.env.AWS_ACCESS_KEY_ID;
    this.secretAccessKey = process.env.AWS_SECRET_ACCESS_KEY;
    this.publicBucketName = process.env.AWS_PUBLIC_BUCKET_NAME;
  }

  getLinkMediaKey(media_key) {
    const s3 = this.getS3();
    return s3.getSignedUrl('getObject', {
      Key: media_key,
      Bucket: this.publicBucketName,
      Expires: 60 * 60 * 12,
    });
  }

  async updateACL(media_id) {
    const media = await this.mediaRepository.findById(media_id);

    const s3 = this.getS3();
    s3.putObjectAcl(
      {
        Bucket: this.publicBucketName,
        Key: media.key,
        ACL: 'public-read',
      },
      // eslint-disable-next-line @typescript-eslint/no-empty-function
      (err, data) => {},
    );

    return (
      s3.endpoint.protocol +
      '//' +
      this.publicBucketName +
      '.' +
      s3.endpoint.hostname +
      '/' +
      media.key
    );
  }

  async upload(file) {
    const objectId = new ObjectID();
    const arr_name = file.originalname.split('.');
    const extension = arr_name.pop();
    const name = arr_name.join('.');
    const key = objectId + '/' + this.slug(name) + '.' + extension;
    const data = {
      _id: objectId,
      name: name,
      file_name: String(file.originalname),
      mime_type: file.mimetype,
      size: file.size,
      key: key,
    };
    await this.uploadS3(file.buffer, key, file.mimetype);

    return await this.mediaRepository.create(data);
  }

  private async uploadS3(file_buffer, name, content_type) {
    const s3 = this.getS3();
    const params = {
      Bucket: this.publicBucketName,
      Key: name,
      Body: file_buffer,
      ContentType: content_type,
      ACL: 'public-read', // comment if private file
    };
    return new Promise((resolve, reject) => {
      s3.upload(params, (err, data) => {
        if (err) {
          Logger.error(err);
          reject(err.message);
        }
        resolve(data);
      });
    });
  }

  private getS3() {
    return new S3({
      region: this.region,
      accessKeyId: this.accessKeyId,
      secretAccessKey: this.secretAccessKey,
    });
  }

  async deleteFileS3(media_id: string) {
    const media = await this.mediaRepository.findById(media_id);
    const s3 = this.getS3();
    const params = {
      Bucket: this.publicBucketName,
      Key: media.key,
    };
    // eslint-disable-next-line @typescript-eslint/no-empty-function
    s3.deleteObject(params, (err, data) => {});
    await media.remove();
    return true;
  }

  private slug(str) {
    str = str.replace(/^\s+|\s+$/g, ''); // trim
    str = str.toLowerCase();

    // remove accents, swap ñ for n, etc
    const from =
      'ÁÄÂÀÃÅČÇĆĎÉĚËÈÊẼĔȆĞÍÌÎÏİŇÑÓÖÒÔÕØŘŔŠŞŤÚŮÜÙÛÝŸŽáäâàãåčçćďéěëèêẽĕȇğíìîïıňñóöòôõøðřŕšşťúůüùûýÿžþÞĐđßÆa·/_,:;';
    const to =
      'AAAAAACCCDEEEEEEEEGIIIIINNOOOOOORRSSTUUUUUYYZaaaaaacccdeeeeeeeegiiiiinnooooooorrsstuuuuuyyzbBDdBAa------';
    for (let i = 0, l = from.length; i < l; i++) {
      str = str.replace(new RegExp(from.charAt(i), 'g'), to.charAt(i));
    }

    str = str
      .replace(/[^a-z0-9 -]/g, '') // remove invalid chars
      .replace(/\s+/g, '-') // collapse whitespace and replace by -
      .replace(/-+/g, '-'); // collapse dashes

    return str;
  }
}
media/controllers/media.controller.ts
import {
  Post,
  UseInterceptors,
  UploadedFile,
  Controller,
  UploadedFiles,
  Get,
  Body,
  Query,
  Put,
  Delete,
} from '@nestjs/common';
import { FileInterceptor, FilesInterceptor } from '@nestjs/platform-express';
import { MediaService } from '../services/media.service';

@Controller('media')
export class MediaController {
  constructor(private readonly mediaService: MediaService) {}

  // get link of private file
  @Get('access')
  async getLinkAccess(@Query('key') key: string) {
    const url = this.mediaService.getLinkMediaKey(key);
    return {
      url: url,
    };
  }

  // upload single file
  @Post('upload')
  @UseInterceptors(FileInterceptor('file'))
  async upload(@UploadedFile() file) {
    return await this.mediaService.upload(file);
  }

  // upload multi file
  @Post('uploads')
  @UseInterceptors(FilesInterceptor('files'))
  async uploads(@UploadedFiles() files) {
    const medias = [];
    for (const item of files) {
      medias.push(await this.mediaService.upload(item));
    }
    return medias;
  }

  // update permission: public-read
  @Put('update-acl')
  async updateAcl(@Body('media_id') media_id: string) {
    return await this.mediaService.updateACL(media_id);
  }

  // delet file
  @Delete('delete')
  async delete(@Query('media_id') media_id: string) {
    await this.mediaService.deleteFileS3(media_id);
    return true;
  }
}
Cuối cùng trong quá trình này là ta sẽ khai báo mọi thứ vào MediaModule
media/media.module.ts
import { Module } from '@nestjs/common';
import { MongooseModule } from '@nestjs/mongoose';
import { MediaSchema } from './models/media.model';
import { MediaService } from './services/media.service';
import { MediaRepository } from './repositories/media.repository';
import { MediaController } from './controllers/media.controller';

@Module({
  imports: [
    MongooseModule.forFeature([
      {
        name: 'Media',
        schema: MediaSchema,
      },
    ]),
  ],
  providers: [MediaService, MediaRepository],
  controllers: [MediaController],
})
export class MediaModule {}
Test API
Upload Single File
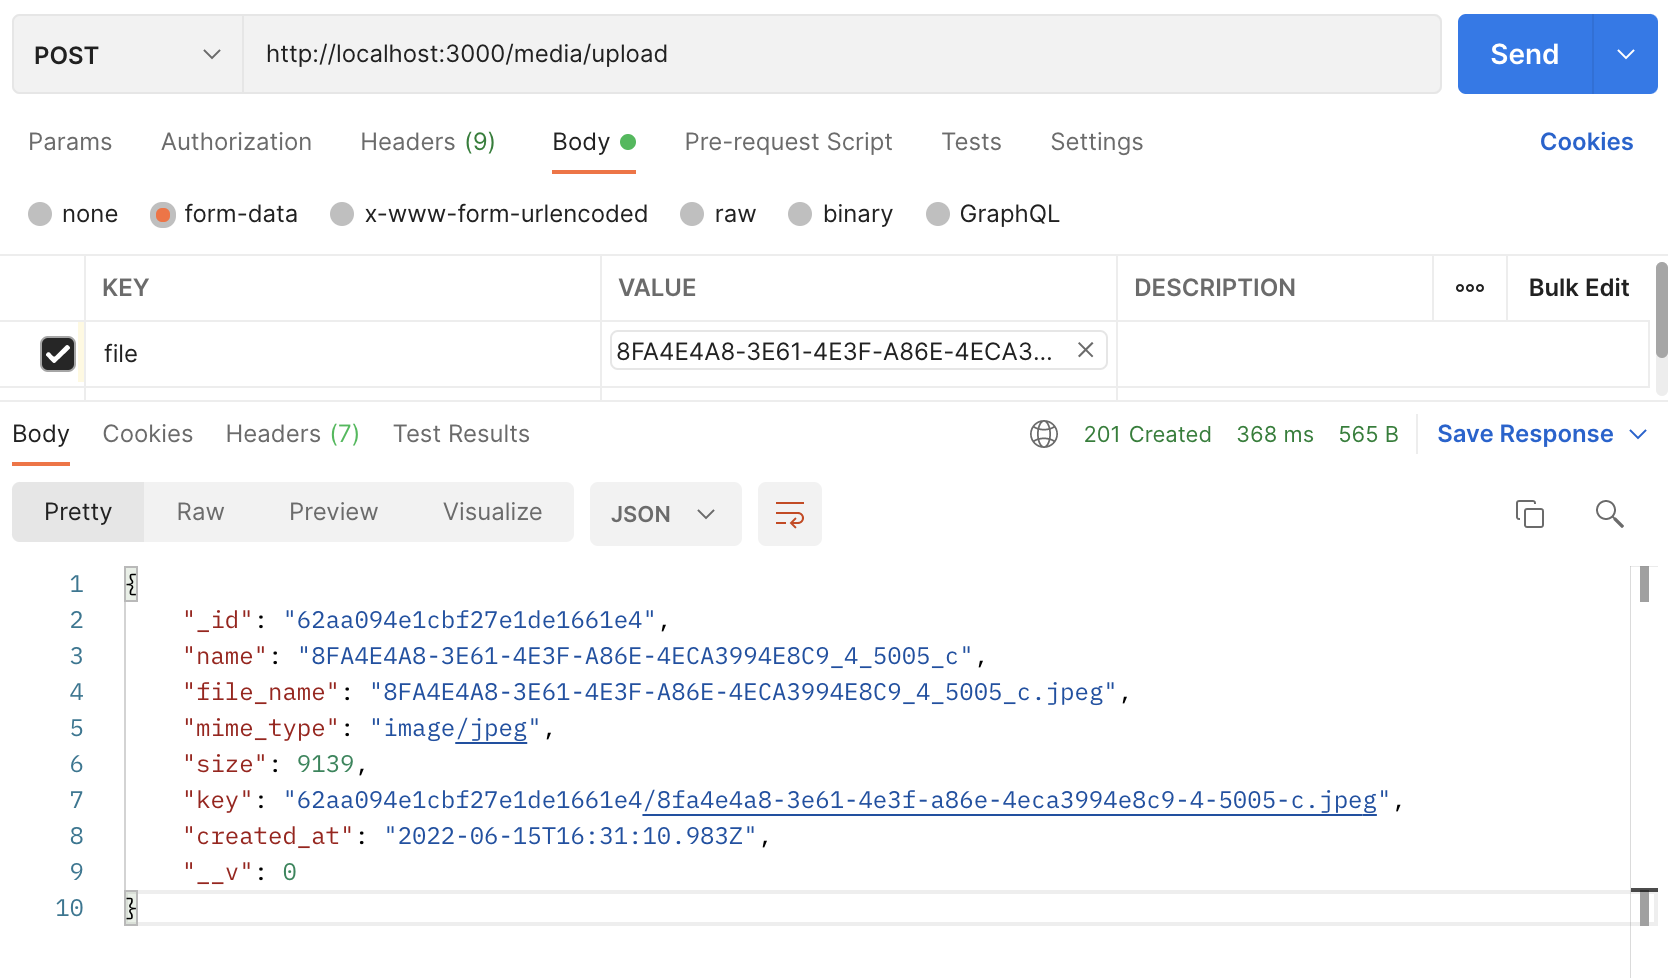
Api này mình trả về model Media, hiện tại tất cả api đều ở dạng public, các bạn muốn lấy link, thì có thể lấy trực tiếp nay sau khi upload bằng cách sau:
const s3_data = await this.uploadS3(file.buffer, key, file.mimetype);
    console.log('MEDIA_URL: ', s3_data['Location']);
Trong màn hình console sẽ trả về link, tùy vào các bạn, có thể lưu nó lại. Ở function updateACL mình cũng đã return về 1 cái link, bạn có thể dựa vào đó.
MEDIA_URL: https://quangdatuit.s3.ap-southeast-1.amazonaws.com/62aa0d766d6047e33624d66b/8fa4e4a8-3e61-4e3f-a86e-4eca3994e8c9-4-5005-c.jpeg
Upload Multi File
Tương tự như trên, chúng ta chỉ truyền 1 mảng file lên thôi, không có gì đặc biệt.
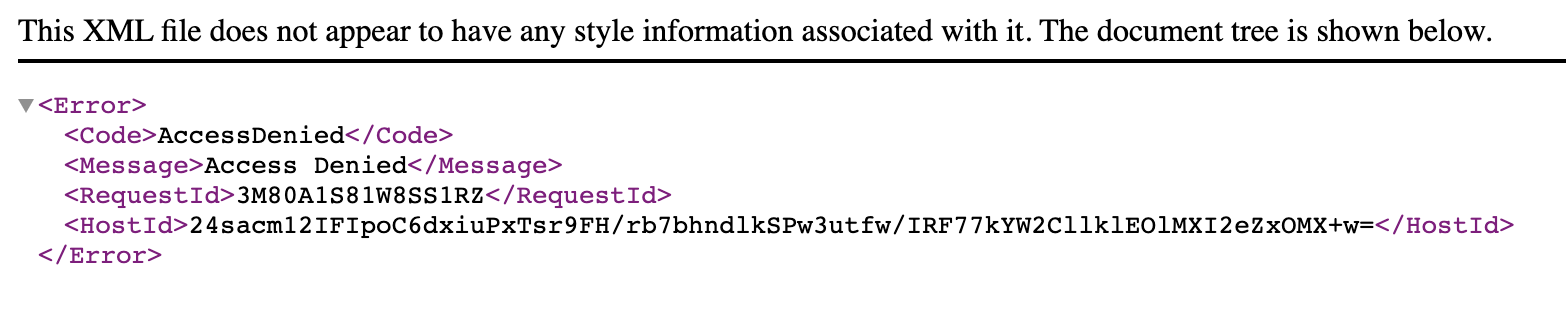
Public file - Update ACL
Dành cho những private file.
Chúng ta command lại phần ACL: 'public-read' trong function uplaodS3, khi đó chúng ta không thể truy cập vào link đường dẫn đã hiển thị ở phần console nữa.
Để có thể truy cập vào file trên, ta cần phải sử dụng token dùng cho việc xác thực: ta call api access
Ta lấy key trả về từ api upload ta vừa thực hiện để lấy URL mới kèm một số query để có quyền truy cập, và thời hạn trong 12h, có thể coi thêm trong service.
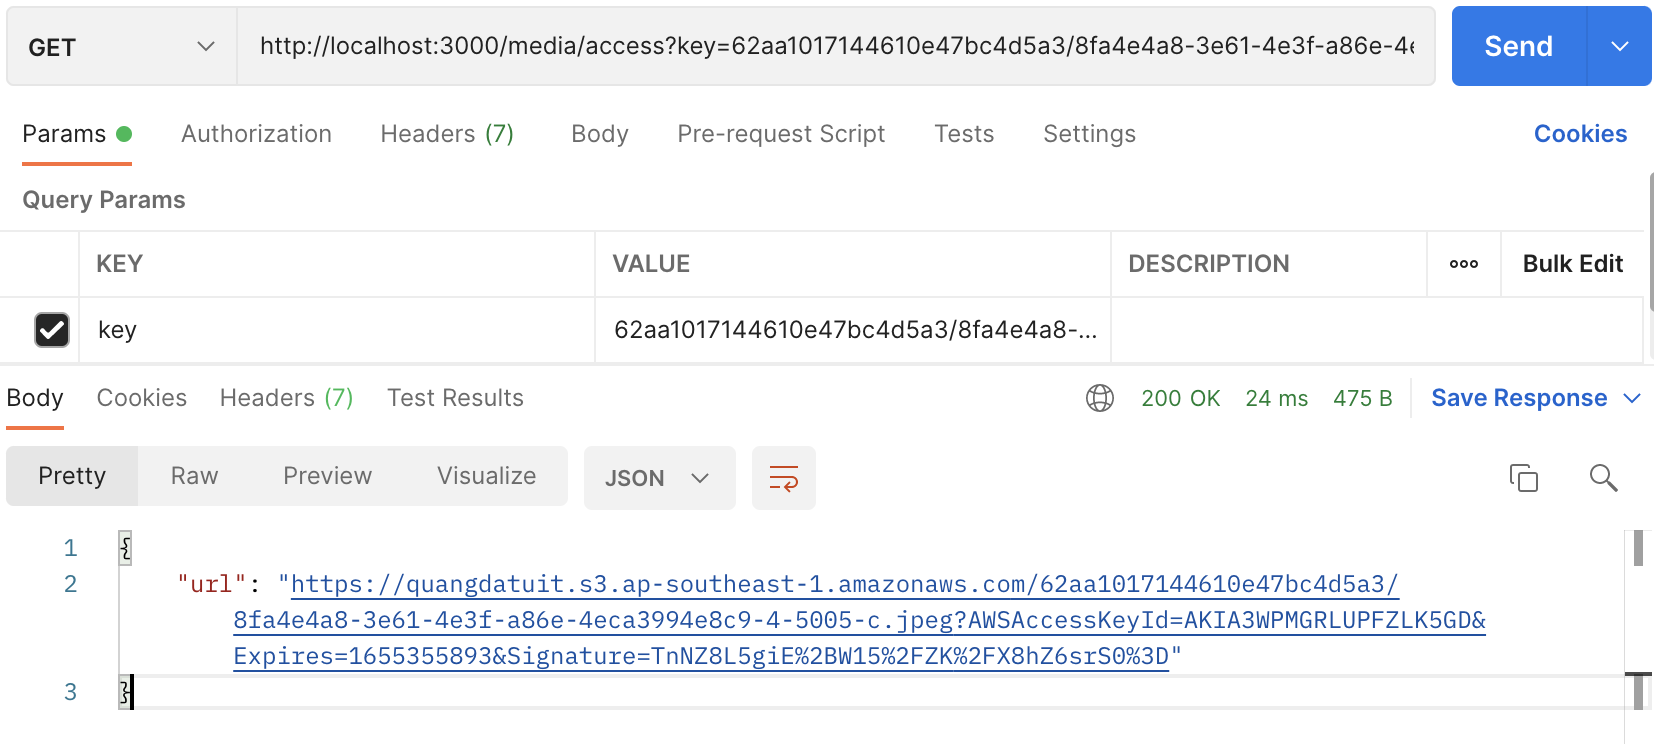
Sử dụng link này có thể truy cập được nha các bạn.
Hoặc các bạn có thể publick read quyền của file bằng cách gọi api update acl
Chúng ta dùng media_id để cập nhật, cái chính ở đây là mình sẽ lấy cái key của nó để update, các bạn có thể thay đổi chỗ này tùy ý:
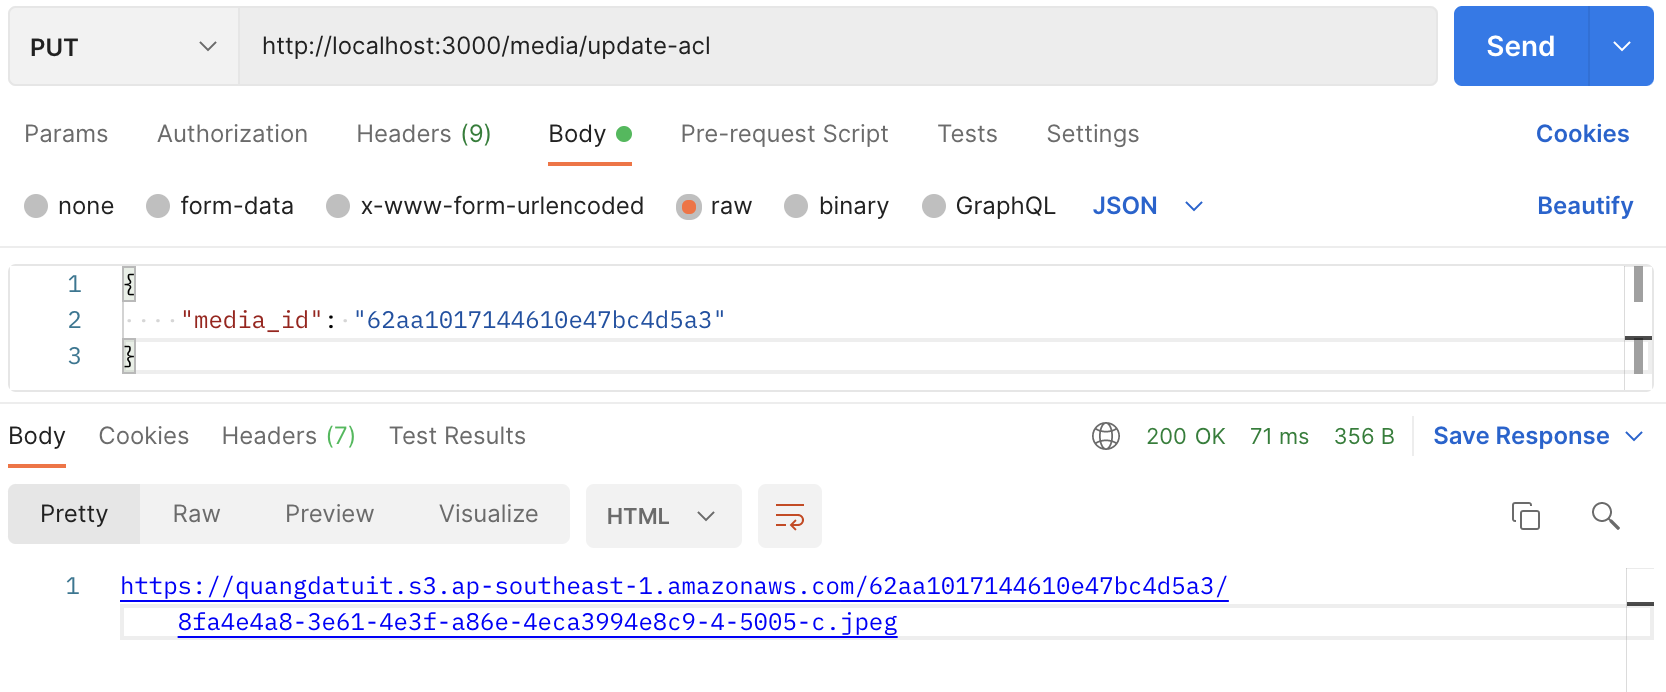
Lúc này ta có thể truy cập được với đường dẫn này ròi nha.
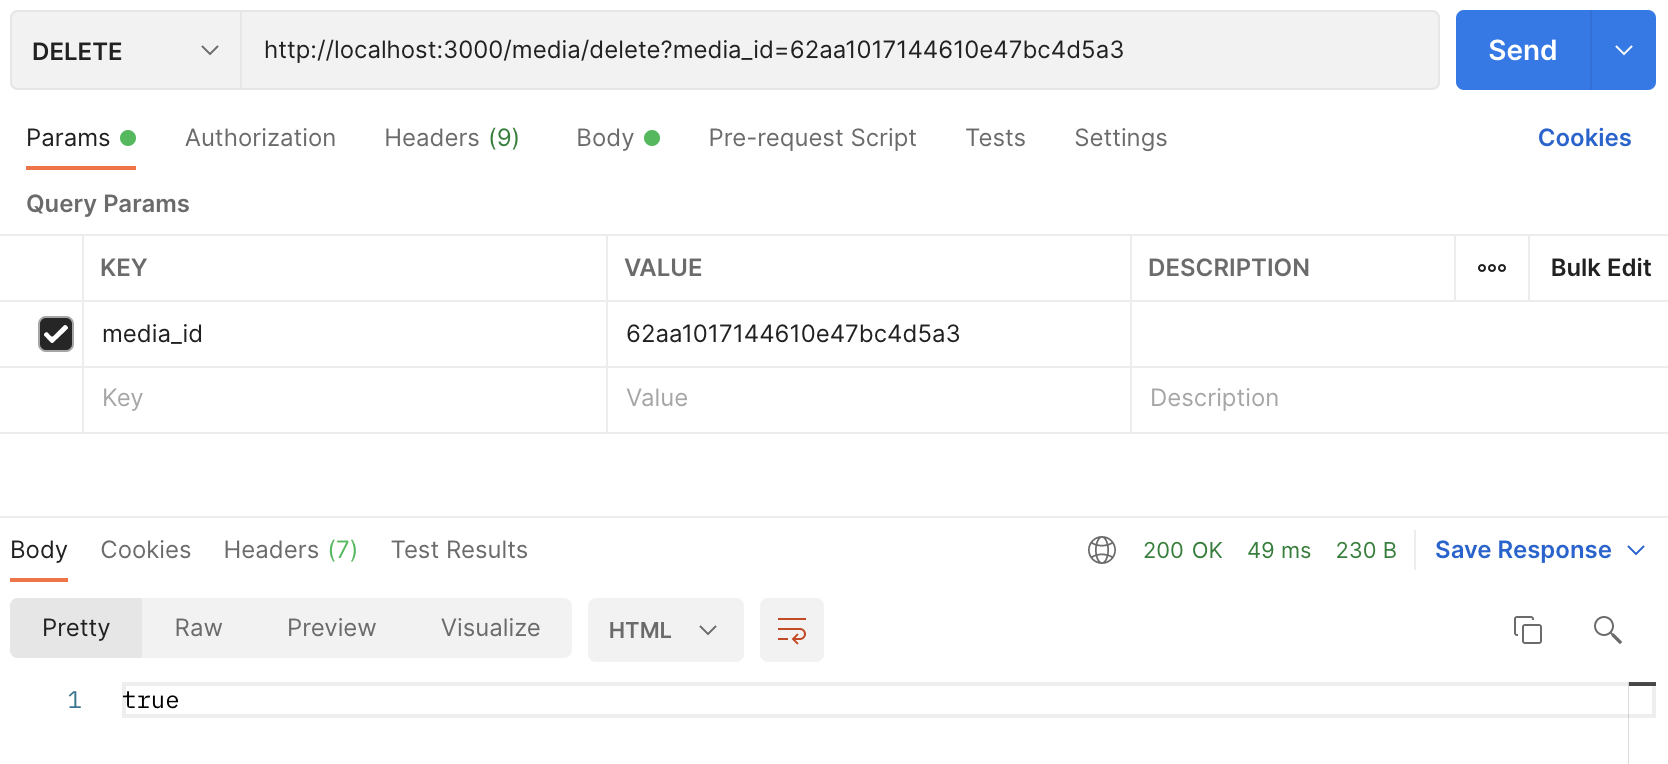
Delete file
Ở đây chúng ta vừa xóa record trong db vừa xóa file trên S3
Ứng dụng
Ở đây mình chỉ nêu một số ý tưởng nếu các bạn muốn thực hành thêm: Ta sẽ thêm hình ảnh cho bài viết.
- Ta sẽ upload hình để lấy id hoặc url của hình ảnh, nhớ set
ACL: 'public-read'. - Trong lúc tạo Post, ta sẽ lưu id hoặc url này vào trong Post luôn.
- Nếu là url thì cứ z hiển thị, còn là id, thì dùng populate để lấy key, và generate ra url. Thông thường những file public là hình ảnh dùng để hiển thị bên ngoài ta cứ lưu URL cho tiện sử dụng.
Kết luận
Trong bài viết này, chúng ta đã tìm hiêu những kiến thức cơ bản về cách hoạt động của Amazon S3 và cách sử dụng nó trong API của mình. Để làm được điều đó, chúng ta đã cung cấp thông tin đăng nhập cần thiết cho AWS SDK. Nhờ đó, chúng ta có thể tải lên và xóa tệp lên AWS.
Chúng ta cũng đã giữ cho cơ sở dữ liệu của mình được đồng bộ hóa với Amazon S3, để theo dõi các tệp của chúng ta dễ dàng hơn. Để tải tệp lên thông qua API, chúng ta đã sử dụng FileInterceptor. Vì Amazon S3 có nhiều thứ hơn là xử lý các tệp công khai, nên vẫn còn khá nhiều thứ để tìm hiểu.
Nguồn tham khảo:
- https://stackoverflow.com/questions/27753411/how-do-i-delete-an-object-on-aws-s3-using-javascript
- Và các project trước mình đã thực hiện.
Rất mong được sự ủng hộ của mọi người để mình có động lực ra những bài viết tiếp theo.
{\__/}
( ~.~ )
/ > ♥️ I LOVE YOU 3000
JUST DO IT!